
TL;DR
Moving your rig into a closet or cabinet can drastically cut noise and reflections. Proper placement, ventilation, and targeted acoustic treatment make this a practical, effective solution for a quiet, high-quality workspace.
Ever wondered if you can turn a tiny closet into a quiet, professional-sounding workspace? The secret isn’t just stuffing foam panels everywhere, like in Acoustic Dampening, Placement, and the “Rig in the Closet” Setup. It’s about where you place your gear, how you treat the space, and managing heat and noise intelligently. This isn’t about making your closet silent — it’s about reducing reflections and controlling the noise that escapes.
In this guide, you’ll learn practical strategies to dampen sound, optimize placement, and avoid common pitfalls. Whether you’re recording vocals or running a high-powered AI rig, understanding these basics can transform your small space into a surprisingly effective setup.
Acoustic dampening
& the rig in the closet.
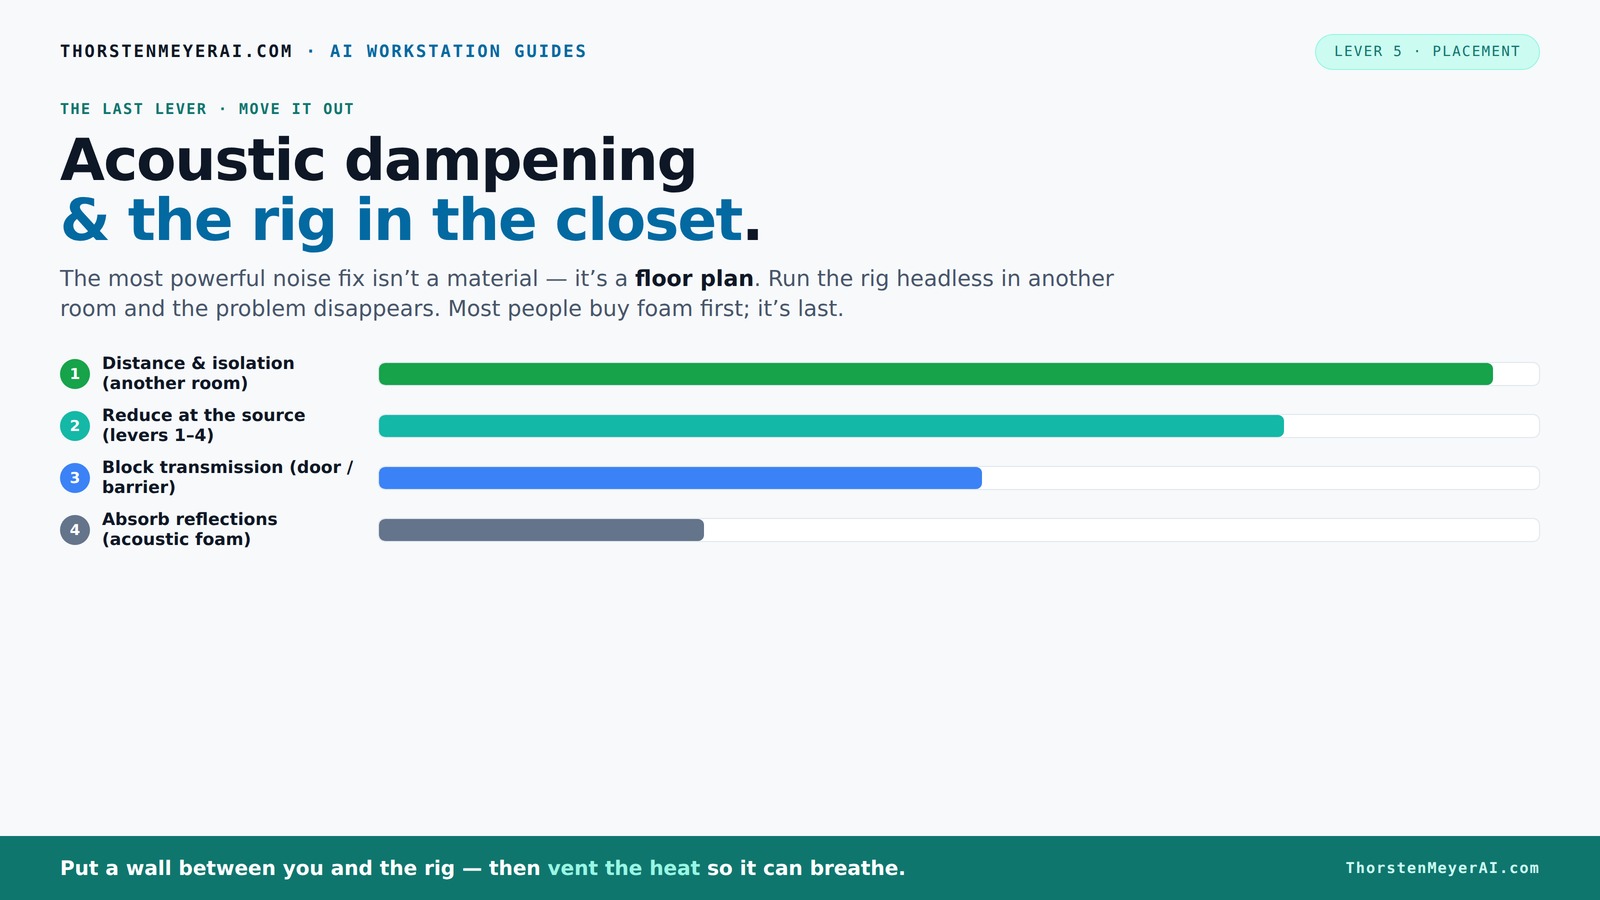
The most powerful noise fix isn’t a material — it’s a floor plan. A rig you can’t hear because it’s in another room beats any amount of foam. Tap the approaches in Part 1 to see what actually works.
(another room)
(levers 1–4)
(door / barrier)
(acoustic foam)
Contain the noise, not the heat
Key Takeaways
- Most interior noise is reflection-based; treating reflection points dramatically improves sound clarity.
- Placement of acoustic panels should target reflection points identified via mirror trick and corners for bass traps.
- Ventilation is critical in a closet rig; proper airflow prevents heat buildup that can throttle performance.
- Moving your rig into another room or closet is the most effective noise reduction strategy.
- Understanding the difference between soundproofing and acoustic treatment helps set realistic goals and solutions.

36 Pack AUSLET Acoustic Panels 12 x 12 x 2 Inches, Pyramid Sound Proof Foam Panels for Wall, High Density Black Acoustic Foam Panels,Soundproof Wall Panels
【Improve Sound Quality】Auslet acoustic foam help much in improving audio and video quality by absorbing and eliminating unwanted...
As an affiliate, we earn on qualifying purchases.
As an affiliate, we earn on qualifying purchases.
Why Most Noise Comes from Reflection, Not the Gear
The biggest misconception is that noise is just the sound of your machine. Actually, most of what you hear is echoes bouncing around your tiny closet. Acoustic panels don’t stop noise; they soften how sound reflects inside — making your recordings clearer and less echoey.
Think of a small closet as a box. Hard surfaces like walls, doors, and floors bounce sound, creating a muddy, boxy tone. Adding panels or blankets at reflection points can soften these echoes. But remember, this only affects sound inside the space, not noise leaking out.
For example, a simple setup with a few foam panels on the side walls and behind your mic can cut flutter echoes by over 50%. It’s about controlling how sound bounces, not just absorbing direct noise from your rig.
Understanding this distinction helps you prioritize your acoustic treatment. For more insights, see this guide on acoustic treatment. If your goal is to improve recording clarity, focus on reflection points. If you want to reduce noise leakage, you need soundproofing measures like sealing gaps or adding mass to the walls. Recognizing the difference allows you to allocate your efforts more effectively, balancing inside-room sound quality with outside noise isolation.

Focusound 52 Pack Acoustic Foam Panels 1" x 12" x 12" Sound Proof Foam Panles Soundproofing Noise Cancelling Wedge Panels for Home Office Recoding Studio with 300PCS Double-Side Adhesive
Soundproofing - Acoustic foam panels triangular grooves structure for better noise absorption, helps to reduce and absorb unwanted...
As an affiliate, we earn on qualifying purchases.
As an affiliate, we earn on qualifying purchases.
Placement Secrets: Where to Put Acoustic Panels for Maximum Impact
Placement is king. The best way to decide where to put acoustic panels in your closet is to find the reflection points. Use the mirror trick: sit at your desk, hold a mirror on the side walls, and place panels where you see the speakers or your mic in the mirror. These spots catch the most reflections.
In tight spaces, the corners matter too. Bass tends to build up there, creating boomy lows. Installing bass traps in corners reduces muddiness and creates a more balanced sound.
Focusing your treatment on these critical reflection points ensures you’re addressing the primary sources of echo and reverberation. Covering large areas indiscriminately can deaden the sound, making it dull and unnatural. Instead, targeted placement preserves some natural room liveliness while controlling problematic echoes. This strategic approach results in clearer recordings and more accurate sound monitoring, especially important for critical listening or mixing in small spaces. Remember, the goal is to tame the problematic reflections without overly deadening the space, which can lead to a boxy or unnatural sound.
Deeply understanding where reflections originate and how they affect your recordings helps you make smarter decisions. You can learn more about proper setup in this resource on acoustic setup. For instance, over-treating a small space can eliminate all ambient sound, resulting in a sterile, unnatural tone that lacks depth. Conversely, under-treating leaves excessive echoes that muddy your recordings. The key is finding a balance — treating enough reflection points to improve clarity without sacrificing the room’s natural liveliness. This nuanced approach enhances your ability to produce professional-quality recordings in confined spaces.

Audimute Soundproofing Acoustic Door Seal Kit - Door Sweep and Seal - (Large Size)
Includes (2) Door Seals (3/16" x 1/2" x 50') and (1) Door Sweep (1/2" x 1.5" x 25').
As an affiliate, we earn on qualifying purchases.
As an affiliate, we earn on qualifying purchases.
How to Keep Your Closet Cool and Quiet: Ventilation Tips
Placing a hot, noisy rig in a sealed closet is a recipe for heat overload and throttling. The key is to provide airflow. Simple passive vents help, but a quiet exhaust fan is even better. This keeps hot air moving out and cool air flowing in, preventing temperature spikes.
Proper ventilation isn’t just about temperature regulation; it directly impacts your hardware’s performance and longevity. For detailed tips, see this guide on cooling and ventilation. Overheating can cause throttling, where the GPU or CPU reduces performance to cool down, which defeats the purpose of a quiet, high-performance setup. Additionally, inadequate airflow can lead to heat buildup that accelerates hardware wear over time. Installing a quiet, thermostatically controlled exhaust fan ensures continuous airflow without adding noise that would interfere with your recordings or AI processing. Properly designed ventilation paths prevent hot spots, maintain stable operating temperatures, and keep noise levels low. This balance is critical for maintaining a quiet yet effective workspace. For more detailed ideas on airflow and ventilation options, check out this [guide on cooling](https://thorstenmeyerai.com/reduce-heat-noise-ai-workstation/).

50 Pack Sound Proof Foam Panels for Walls, 2 X 12 X 12 Inches Acoustic Foam Panels, High Density Acoustic Panels Sound Absorbing, Noise Cancelling Studio Wedges, Black (NOT INCLUDE ADHESIVE)
PROFESSIONAL SOUND ABSORBING PROPERTIES – Our acoustic foam panels are expertly designed to reduce noise pollution by absorbing...
As an affiliate, we earn on qualifying purchases.
As an affiliate, we earn on qualifying purchases.
The 'Rig in the Closet' Strategy: How It Works and What to Watch For
The 'rig in the closet' approach is about moving your noisy, heat-generating machine into a separate space. It’s the most effective way to cut noise — you just don’t hear it at all. But there’s a catch: heat buildup. If you seal a closet without proper ventilation, temperatures soar, and your hardware throttles or shuts down.
To make this work, add active ventilation, like a ducted exhaust fan, or even a purpose-built soundproof cabinet. This way, your rig can run at full tilt without overheating or creating noise in your workspace.
Understanding the tradeoffs is key: while isolating your rig reduces noise, neglecting ventilation can lead to overheating, which damages hardware and reduces lifespan. Proper airflow solutions—such as ducted exhausts, inline fans, or vented panels—are essential to balance noise reduction with thermal management. This setup allows you to operate your high-performance rig quietly and reliably, avoiding the pitfalls of heat buildup while maintaining a quiet environment for your work. Learn more about effective strategies at this comprehensive guide. Recognizing these tradeoffs ensures you don’t sacrifice hardware health for sound isolation alone.
Check out this [comprehensive guide](https://thorstenmeyerai.com/reduce-heat-noise-ai-workstation/) for detailed setup tips.
Soundproofing vs. Acoustic Treatment: What’s the Difference?
Soundproofing and acoustic treatment aren’t the same. To understand the differences, visit WhiffWhisper. Soundproofing blocks sound from leaving or entering a space. Think of it as adding mass and sealing cracks — like extra drywall or sealing gaps. Acoustic treatment, on the other hand, controls sound *inside* the room, reducing echoes and flutter.
In a closet, your goal is often a mix: block some noise from escaping while reducing reflections for clearer recordings. Use foam panels to tame echoes and sealing cracks to stop sound leaks.
For example, sealing the door gaps with weatherstripping and adding acoustic panels makes a big difference. This dual approach keeps the noise in and the reflections out, creating a balanced environment. Understanding when and where to apply each method is crucial. Overdoing soundproofing in a small closet can deaden the space excessively, leading to unnatural sound. Conversely, neglecting soundproofing can result in noise leaks that disturb others or compromise privacy. A balanced approach—targeting sound leaks and reflection points—ensures your space is both quiet and acoustically controlled, optimizing both recording quality and privacy.
Read more about this distinction in this [soundproofing vs. treatment guide](https://thorstenmeyerai.com/reduce-heat-noise-ai-workstation/).
Practical Tips for a Cost-Effective Closet Booth
You don’t need a fortune to improve your closet’s acoustics. Start with simple, cheap fixes: moving blankets, rugs, and reflection filters. These can cut flutter echoes and reduce high-frequency reflections without breaking the bank.
For example, hanging a thick blanket over the door and placing a rug on the floor can soften the space. Reflection filters around your mic trap sound waves right where you need them, making your voice clearer.
More involved upgrades include sealing cracks, adding extra drywall, or installing bass traps. But for most hobbyists, strategic placement of affordable materials makes a noticeable difference. The key is understanding which areas contribute most to unwanted reflections and addressing those specifically. This targeted approach maximizes your budget and achieves meaningful improvements in sound quality. It’s also worth noting that some inexpensive materials, like thick blankets or foam panels, can be surprisingly effective when placed correctly, providing a good balance of cost and benefit.
Check out this [budget-friendly guide](https://thorstenmeyerai.com/reduce-heat-noise-ai-workstation/) for ideas on cheap, effective treatments.
Frequently Asked Questions
Can I really use a closet as a vocal booth?
Yes, many DIYers turn closets into effective vocal booths. The key is adding enough absorption to tame reflections and ensuring good ventilation to prevent heat buildup. It’s a budget-friendly way to get studio-quality sound at home.
What is the difference between soundproofing and acoustic treatment?
Soundproofing blocks sound from leaving or entering a space, often involving mass and sealing gaps. Acoustic treatment controls sound reflections inside the room, making it sound clearer and less echoey. Both are important but serve different purposes.
Where should acoustic panels go in a closet booth?
Focus on reflection points — the side walls where sound bounces, behind and in front of the mic, and corners for bass traps. Use the mirror trick to find the best spots and avoid covering every surface blindly.
Do I need bass traps in a small closet?
Yes, if your space sounds boomy or uneven, bass traps in corners help absorb low-frequency buildup. They make your recordings tighter and more balanced, especially in tight, enclosed spaces.
How much panel coverage is enough?
About 20-40% coverage, focused on reflection points, is enough for small rooms or closet booths. Overdoing it can deaden the sound, so target your treatment wisely.
Conclusion
In small spaces, smart placement and targeted acoustic treatment matter more than expensive foam or full sealing. Moving your rig into a closet or another room might be the best noise solution of all — with proper ventilation, it’s a win-win. Remember, controlling reflections and heat makes your setup quieter and more professional.
Think of your closet as a blank canvas. With just a few strategic moves, it can become a surprisingly effective, quiet workspace. Why settle for a noisy room when a little planning can make all the difference?